You go your new rental property, flip, or home under contract. Awesome, Congrats!
Now, you hire an inspector and are done with it, right?
What if I told you that’s a terrible idea?
They generally help you negotiate off more than they cost, so, A home inspector is a great first step.
But, if you expect one person you know everything about the roof, siding, foundation, electrical, plumbing, HVAC/Heating, structures, windows, and all construction best practices… then you’re crazy.
The solution?
I usually recommend that you should know enough to inspect the inspector.
There is no limit to the amount of diligence you can/should do and the roof is a great place to start because it’s such an expensive fix.
- What is the Purpose of a Roof Inspection During Due Diligence?
- Do Two Roof Inspections
- Steps to a Quick Roof Inspection
- The Steps to a Thorough Roof Inspections
- Roof Inspection Complete, Now What?
What is the Purpose of a Roof Inspection During Due Diligence?
You’re looking for a few pieces of information when inspecting your roof before buying a property
- Is the roof currently damaged and in need of immediate repair/replacement?
- Approximately how old is the roof?
- How much life is left in the roof?
- Is there any hidden or structural issues related to the roof?
- What is the approximate cost to fix/replace it?
You really haven’t done a good inspection if you can’t answer these basic questions. Fortunately, they are easy to find answers to and we’ll go over them all!
Also, you should do semiannual or annual inspections of your roof, so this is a perfect list for that as well.
Do Two Roof Inspections
When purchasing a house or rental property, you should do 2 roof inspections.
I know, you probably think I’m crazy, but think about it this way: The first inspection is when you’re touring the property and decide to make an offer. The second inspection is more formal and done during the actual diligence.
Why two?
If the house is listed as having a good roof and you see obvious damage, you know you can negotiate that off later (or walk away without making an offer). We’ll call this the quick roof inspection.
In other words, you can offer more knowing you’ll beat them up on that later which means you can be more likely to win during the initial bidding process.
Then, you need to do the actual (or thorough) inspection to have evidence there is damage so you can renegotiate the price.
Steps to a Quick Roof Inspection
Here are the basic steps to doing a quick inspection before making an offer on a property.
What You’ll Need to Do a Quick Roof Inspection
Before starting, you’ll need a few basic items to finish your quick roof inspection
1. Clipboard, Pencil, and Calculator
You’ll need to take notes and estimate the approximate area of the roof surface to get your initial estimate.
While you could use the calculator on your phone, it can get annoying to handle 3 or 4 things in your hands, so I like to use something that keeps it easy.
I like something that stores paper so I can keep the listings in order and write notes on them. That way when I get home, I can have them all organized and decide what I want to offer on first, second, etc.
There is nothing worse than getting home and not remembering which property was what because I didn’t keep it organized, then I’m asking the Realtor which house we saw 4th…
2. A Pair of Binoculars
You don’t have to go crazy on this, but you absolutely need a pair of binoculars to see the finer details on the roof.
Binoculars range from about $10 to $5,000, so it’s impossible to get into all the details on them, but you’ll basically want the following features:
Compact – Carrying giant binoculars on house tours just looks weird. You want something that fits in your jacket pocket.
High Magnification – to see all the details of the roof.
Waterproof and Fog Proof – You never know if it’s going to be raining or have high humidity during your tour.
There are some dirt cheap binoculars out there, but I like these Bushnell’s because they have a 12x magnification (letting you really see the shingles) and are also waterproof.
Plus, you can hang on to them and use them on your next vacation.
1. Walk the Perimeter
The first thing you’ll do is walk the exterior to inspect the roof from the ground. Here, you’re just getting a feel for the roof and structure and finding anything obvious.
2. Take Notes on Potential Problem Areas
While walking the perimeter, take notes on any areas that may be of concern. These are areas with moss, piles of leaves, any obvious rot, major sagging, etc.
You’ll come back to these in a bit.
3. Determine Shingle Condition
You’re really looking for two major things when looking at the shingle condition.
Buckling and Curling
When the attic gets excessively hot, it causes the shingles to curl away from the wood underneath. This puts your home or rental property at a huge risk for water penetration.
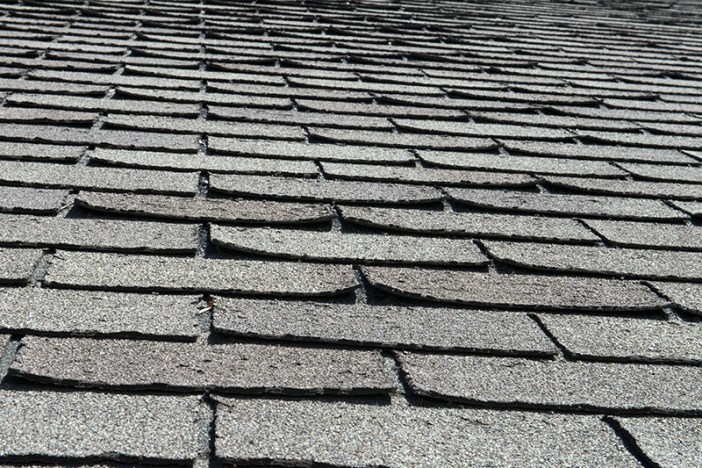
If you see an entire roof with curling shingles like this, it needs a new roof.
But, not only that, this is indicative of poor ventilation in the attic which means you’ll need better vents installed as well.
Texture and Granule Loss
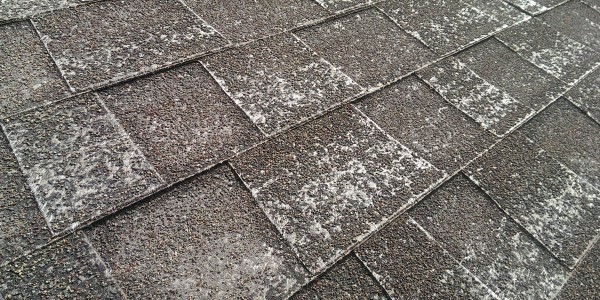
The next thing to watch out for is the texture of the shingle and if it’s missing granules.
Granule loss is a sign of a lot of things such as age and weather. Hail is notorious for ripping the granules off a roof.
Shingles like the ones below are flat but smooth and have little texture and little life left.
4. Look for Missing or Damaged Shingles
Here, you’re looking for actual missing, cracked, broken, or hanging shingles.
Sometimes wind can rip one or two shingles off or hail/debris can crash into the roof and crack or damage areas.
5. Determine if The Gutters Are Cleaned Regularly
Cleaning the gutters is important to maintaining your roof. Look for plants growing in the gutters, piles of leaves or dirt, and discoloration that would show excessive wetness over a prolonged period of time.
Take note of anywhere there is discoloration or excessive leave buildup. You’ll want to come back to this area and check for hidden rot during the thorough inspection.
6. Rough Estimate to Repair/Replace
A roof is priced based on the number of square that need to replaced. A square is simply a 10×10 section of roof equivalent to 100sf.
While you are probably not in any position to quote a roof, because it’s very complicated, you can work to get a real rough-ball estimate for repairs to have an idea if this is a property you want to pursue. If it needs an entirely new roof it’s best to get a quote.
Estimate the Number of Square
First, you will want to measure or pace off the length of the roof. For rough estimates I just walk it and estimate the feet that way.
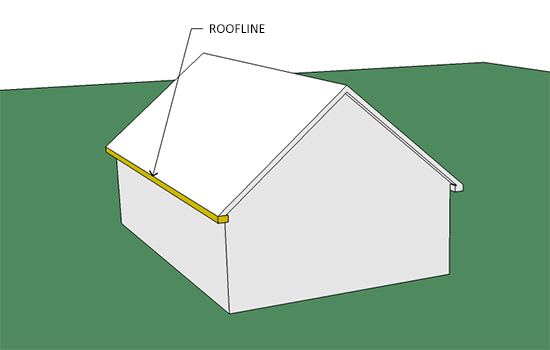
I’ve included this image just to help visualize. So, once you’ve estimate the length of the damaged area in the highlighted area, it’s time to walk from the edge of the house to the center of the house.
Let’s assume there is a 10′ section of roof along the roofline that is damaged and it’s also 10′ from the side of the house to the center (where the roof peak is).
THIS IS NOT 100 sf!
This is because the roof is pitched. While you could measure it exactly using the Pythagorean theorem or your trig functions from high school (remember SOCAHTOA), who wants to do that.
Instead, just add approximately 40% to the area to account for the slope. So, 10′ x 10′ will be roughly 140 sf or 1.4 square.
Get a Rough Price Over the Phone
This is the part where you need to dig into your network or start calling referrals for roofing companies.
If you explain to them you are just going through the inspection process and don’t want to waste their time doing a quote, they may be willing to give you a super rough cost per square.
Just apply that number to the total square, and then round up just in case (I add around 50% for cost of disposal and unknown expenses).

Wrapping it Up
You’ve actually got a huge amount of information and it only took you 10 minutes!
Crazy, right?
Now, you are armed with the basics to go into negotiations with the seller, or you can decide to walk away if the roof is too much work.
If you do move forward, you’ll want to do a thorough inspection of the roof.
The Steps to a Thorough Roof Inspections
The thorough inspection includes the first 5 steps of the quick inspection and builds upon that. (you won’t need to do the price estimate until the very end though).
But, you’ll need some additional tools to accomplish this.
In addition to the basics required for the quick inspection, you’ll need a couple more items for this.
1. Picks or Awls
You don’t realize you need this until you get up there to look, then you find yourself at the local hardware store paying 50% more and wasting a bunch of time.
So, just grab it now.
The awl has a lot of uses, but you’ll want it for probing the wood surface (NOT THE SHINGLES). By poking at the wood, you will quickly find if there is any rot.
You need something that is long to get into hard to reach places such as behind gutters or in corners.
2. A Ladder
A ladder is no small expense, but if you are going to be a homeowner or investor, you need one.
The absolute most convenient and amazing ladder you can get (as a regular average Joe and not a contractor) is a telescoping ladder.
It can fit in the back seat of your car or even in the trunk if you have a crossover or SUV.
If you plan to get up on the roof of a typical single-family home, you’ll need something a bit longer. If it’s one story you can get to the gutters with a 6′ ladder but need 10′ to safely get on and off.
For a 2 story house, you can probably find a way to make a smaller ladder work (get onto an overhang and then climb up) but it’s safer to get something a bit longer that will let you get up there, around 15′ +.
Remember, steps 1-5 have no change. Now that you have actually put the property under agreement you can do the full inspection.
6. Grab Your Ladder and Climb Up (replaces the old step 6)
While on your roof you’ll want to inspect for the following items.
Counter and Step Flashing
This is any area that has an extra layer of metal or other waterproofing material installed over the shingles. This is done a lot on interior corners, valleys, where the siding meets the roof or chimney, etc.
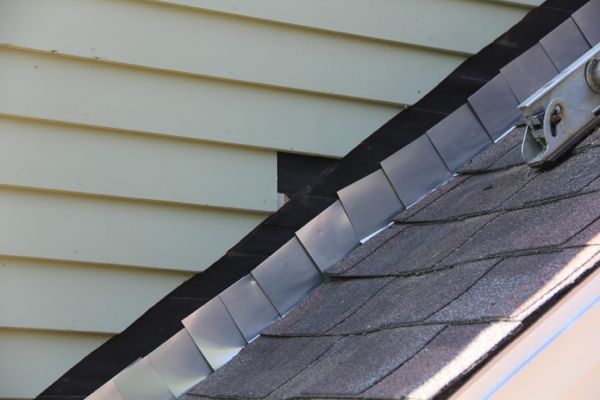
You want to make sure the flashing is in good condition. If there is caulking used, make sure it is in good shape and not cracking or peeling off.
Make sure it is tight to the wall, embedded in masonry or tucked behind the siding. Anything that is exposed needs to be caulked.
Squishy or Sagging Areas
There is always some flex in any wood, but if you walk on one area and there is a squishy feeling, it may be a sign that water has been penetrating and there is some rot.
Take note of this and inspect it from the interior of the home to see if there is any discolored wood.
Caulking and Sealant
Make sure all caulking or other sealant is in good condition. The last thing you want is $1,000+ repair due to $2 in caulking peeling off.
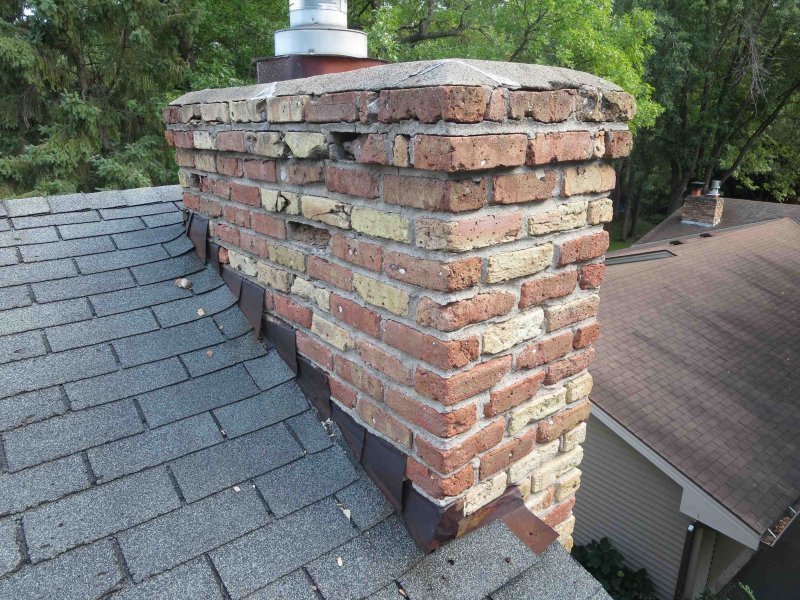
Chimney
While you can any obvious problems from the ground, while on the roof you will want to inspect for cracking or chipping masonry.
Make sure the top is in good shape and water cannot penetrate.
Think Safety!
Most roofs are fairly steep in the pitch, and getting up and walking on the roof can be dangerous.
You need to consider a safety harness, fastening the ladder, or protecting yourself in other ways.
Check Soffits and Fascia
Don’t forget to probe the fascia for rot, check to make sure the gutters are secured well (if they aren’t the screw holes may be rotted).
You’re basically checking any and all wood you can find on the exterior of the home.
7. Inspecting the Attic
Obviously you will skip this step if the home doesn’t have an attic.
Here, you’re looking for any discoloration (usually black but can be something else). Any discoloration shows regular water penetration.
Related to that, look and smell for mold or mildew. You won’t smell it until it gets bad (unless you have a nose for it like I do!), but sometimes you can’t see the water penetration so your nose is all you have to go on.
Look for good sheathing under the roof that looks like solid wood (newer homes have plywood but older homes use planks). Weak and old planks will have to be replaced or overlaid with plywood, seriously increasing the cost to replace a roof.
Also, look for rusty nails as this is a sign of water penetration as well.
8. Estimate the Cost
This is where you will do the cost estimate as was already outlined above.
Now that you are during the diligence period, it may be worth it to get a real quote from a legitimate company so you have more power during negotiations.
Roof Inspection Complete, Now What?
If you are in the purchase process you need to make a decision now – Continue negotiations or walk away. Sometimes it’s better to lose the inspection money than buy a lemon…
I believe it’s always best to negotiate it back as a credit so you have the money to actually get the work done. But, never buy something with immediate repairs required if you don’t have the money to do them!
It’s just a disaster waiting to happen.
What do you think? Have you ever bought a property that needed serious roof work?
Eric Bowlin has 15 years of experience in the real estate industry and is a real estate investor, author, speaker, real estate agent, and coach. He focuses on multifamily, house flipping. and wholesaling and has owned over 470 units of multifamily.
Eric spends his time with his family, growing his businesses, diversifying his income, and teaching others how to achieve financial independence through real estate.
You may have seen Eric on Forbes, Bigger Pockets, Trulia, WiseBread, TheStreet, Inc, The Texan, Dallas Morning News, dozens of podcasts, and many others.

Leave a Reply